Diagnosis of Loud Rattling Noise in Ninja AF160UK Air Fryer
Validated by Luca Chia, Certified Electronic Technician
Revision of 16/06/2026
WARNING: This appliance is connected to the mains electricity and generates extreme heat. It is mandatory to always unplug it from the socket and allow it to cool completely (at least 45 minutes) before any internal inspection, to avoid the risk of electric shock and severe burns from contact with the heating element. If physical intervention requires disassembling the casing, it is recommended to rely on a qualified technician. ReeFix provides this diagnosis EXCLUSIVELY for educational and informational purposes.
REQUIRED TOOLS
- Precision screwdriver set (including security Torx bits, often used by Ninja)
- Socket wrench or fine-nose pliers (for the fan nut)
- Prying tools/plastic spudgers (for opening the casing)
- Flashlight
- Protective gloves
PHASE 1: Preliminary Inspection and Quick Checks (Without Disassembly)
Objective: Identify the most probable cause without opening the appliance, or confirm the need for a more in-depth intervention.
-
External Check and Basket:
- With the Air Fryer off, unplugged, and cold, gently shake the appliance. Feel if there is anything loose inside the cooking chamber.
- Remove the basket. Check for any solid food residues or small objects that may have fallen under the grill or between the basket and the housing. Sometimes, a piece of carbonized food or a fragment of non-stick coating can cause noise if it gets stuck.
- Verify that the basket is inserted correctly and does not have excessive play. A poorly positioned basket can vibrate against the walls.
- Key signal: If the noise decreases or disappears by shaking or repositioning the basket, it is likely a positioning problem or minor debris.
- Probability: Superficial foreign object or poorly positioned basket (15% of cases).
-
Careful Listening:
- Turn on the Air Fryer (without food) for a few seconds and listen carefully to the nature of the noise.
- Is it a metallic rubbing noise, a loud rattling, or a deep hum?
- Counter-example: If the noise is a constant, deep hum without metallic vibrations or knocking, it might indicate an electrical problem or a bearing in the early stages of wear, but less severe than a metallic rattling.
- Safety note: Never attempt to insert tools or fingers through the top grill while the fan is operating.
-
Vibration Check:
- During operation, gently touch the outer casing of the Air Fryer. Is the vibration localized in the upper part (where the motor resides) or does it propagate throughout the entire appliance?
- Key signal: If the vibration is strong and accompanied by a sharp metallic noise, it suggests that the fan is physically hitting another internal component.
PHASE 2: Internal Diagnosis (Requires Disassembly)
Objective: Isolate the specific cause of the noise. This phase requires opening the appliance (removing the top grill or casing) and, for your safety, it is preferable to rely on a qualified technician.
-
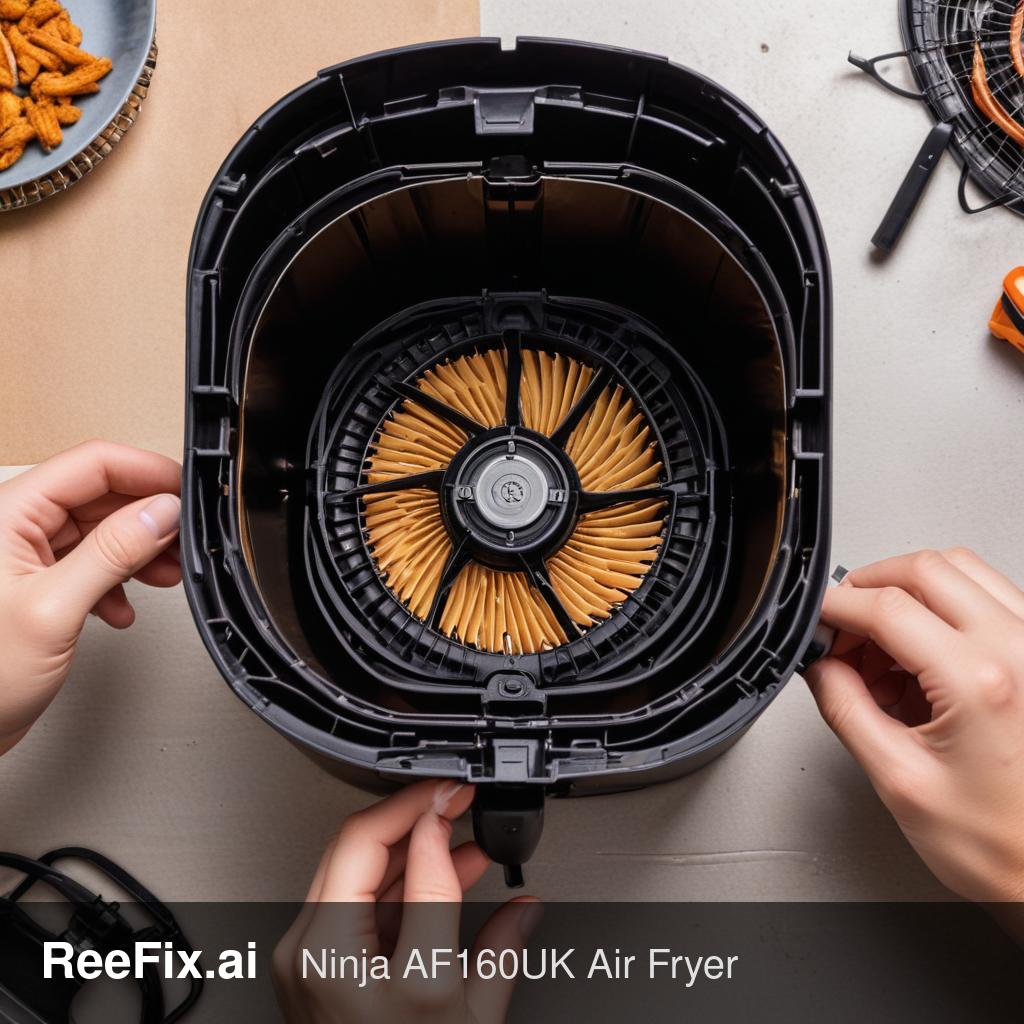
Cause 1: Loose Fan Nut or Unbalanced Blades (Probability: 45%)
- Key signals: Very loud and metallic "rattling" noise. This is the most common defect: with heating and cooling cycles, the nut securing the fan to the motor shaft loosens. The fan slides downwards and starts hitting the heating element or the protective grill.
- Verification: By removing the top protective grill (when cold), try to move the metal fan with your fingers. If it has play on the shaft or if the central nut is loose, you have found the problem. Also check that the blades are not bent or weighed down by asymmetrical accumulations of carbonized grease.
- Cost: Zero cost if it's just a matter of tightening the nut or cleaning grease. If the blades are irremediably deformed by impact, it will be necessary to look for Ninja AF160UK Air Fryer fan blades replacements (20-40€) + labor.
- Common mistake: Continuing to use the appliance with a loose nut, leading to the destruction of the blades or damage to the heating element.
-
Cause 2: Foreign Object in Fan Assembly (Probability: 25%)
- Key signals: Rubbing or intermittent noise, sudden onset of noise. You might see debris such as light food pieces (e.g., sucked-in parchment paper) stuck between the blades or between the fan and its upper housing.
- Verification: Meticulously check the area above the heating element. Remove any debris with tweezers.
- Cost: Zero cost if DIY, otherwise technician labor cost.
- Real micro-case: It often happens that parchment paper fragments not secured by food are sucked in by the powerful airflow, getting stuck in the rotor and generating an annoying noise.
-
Cause 3: Motor or Bearing Wear (Probability: 15%)
- Key signals: Grinding, "roaring" or sharp squealing noise that worsens as the appliance heats up. If, with the machine off, the fan offers strong resistance to being turned by hand or makes a "scratching" noise, the motor is compromised.
- Verification: The problem lies in the internal motor bearings that have dried out or worn due to extreme heat.
- Cost: Although some attempt to look for individual Ninja AF160UK Air Fryer fan bearings, the motor disassembly operation is complex and not recommended. In most cases, the standard solution is to purchase a complete Ninja AF160UK Air Fryer fan motor (30-70€) + high labor cost.
- Why: Air fryer motors are often sealed units; replacing the entire block ensures problem resolution and restoration of safety.
FINAL VERIFICATION
Quick Operational Decision (<=60 seconds):
- If the problem is a loose or dirty fan nut (Cause 1) / Foreign object (Cause 2): Repair it yourself (if you have the skill to safely remove the grill) or contact a technician for a quick intervention. Cost: None or Low (labor only).
- If the diagnosis indicates fan blades are deformed: Contact a technician for blade replacement. Cost: Medium (20-40€ replacement + labor). Repair is generally cost-effective.
- If the diagnosis reveals a faulty motor or seized bearings (Cause 3): Contact a technician for complete motor replacement. Cost: High (30-70€ replacement + high labor cost). Given the complexity of the intervention and the total cost which can approach the value of a new one, it is often more cost-effective to replace the entire device.
Why is my Ninja AF160UK air fryer making a loud rattling noise?
A rattling Ninja AF160UK often indicates loose food debris, an improperly seated basket, or a dislodged internal component like the fan. Check externally first.
What are common diagnostic steps for an air fryer rattling noise?
Start by unplugging and cooling the unit. Check for loose food particles or objects in the basket area. Ensure the basket is correctly seated. Gently shake for internal looseness.
When should I call a technician for an air fryer rattling noise?
If external checks don't resolve the rattle and internal disassembly is required, it's recommended to consult a qualified technician to avoid electric shock or burns.